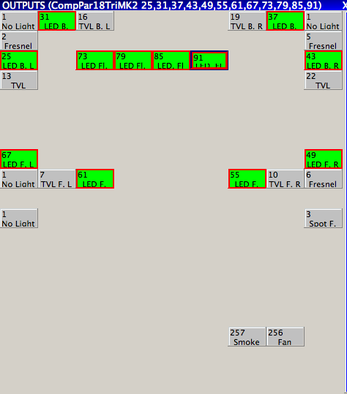
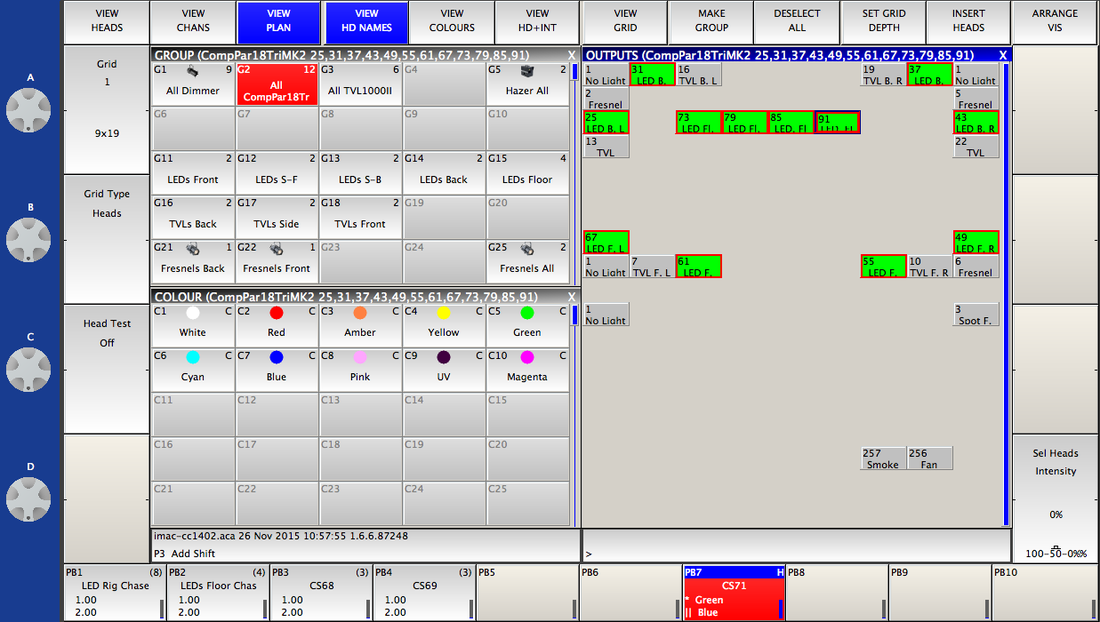
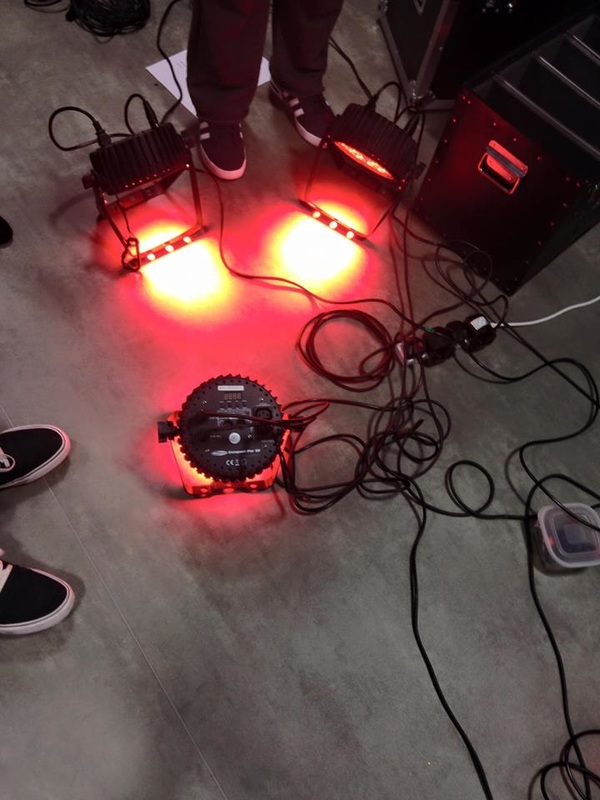
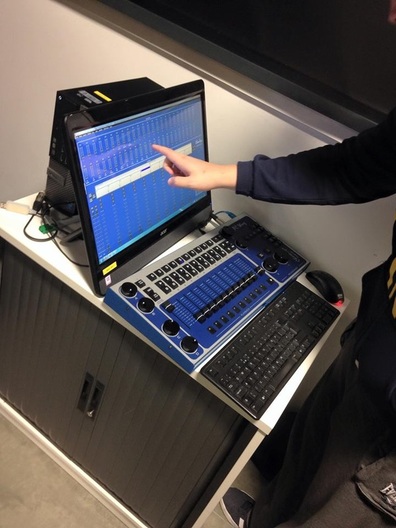
Today we were taught how to use an industry approved lighting programme called Magic Q. This programme is linked to the black box studio where all the lighting is. Here is a picture of the Grid that has all the lights on it. The grid corresponds to the set up in the black box studio. The smoke machine and fan are on the floor which is why they are placed at the bottom: 
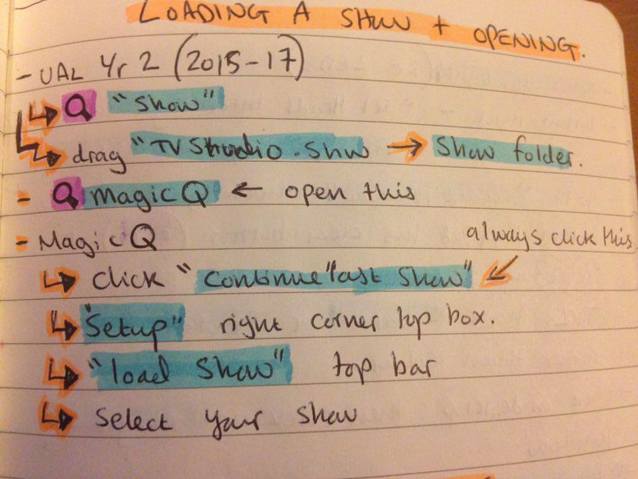
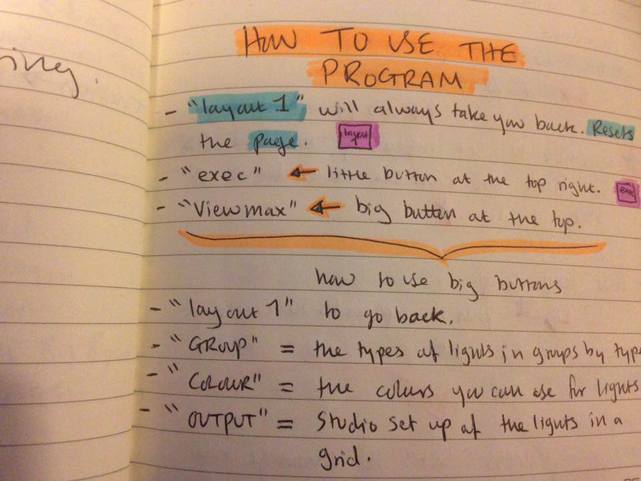
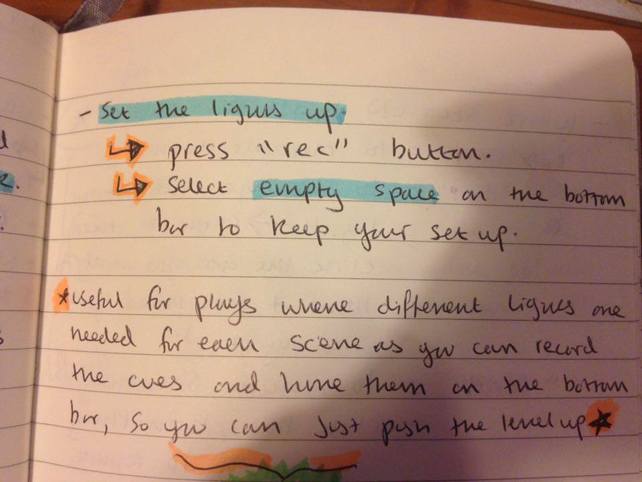
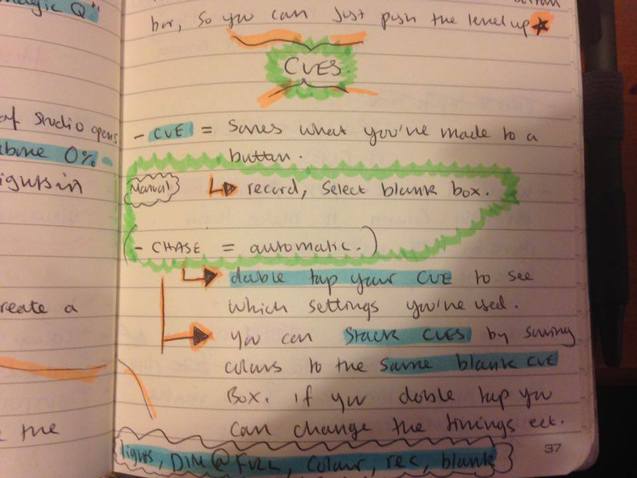
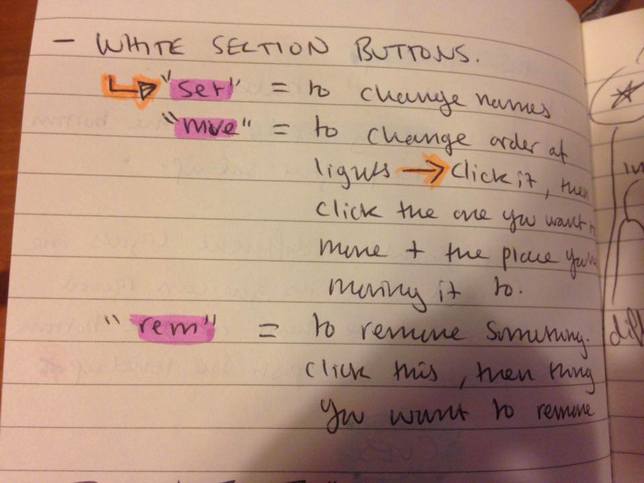
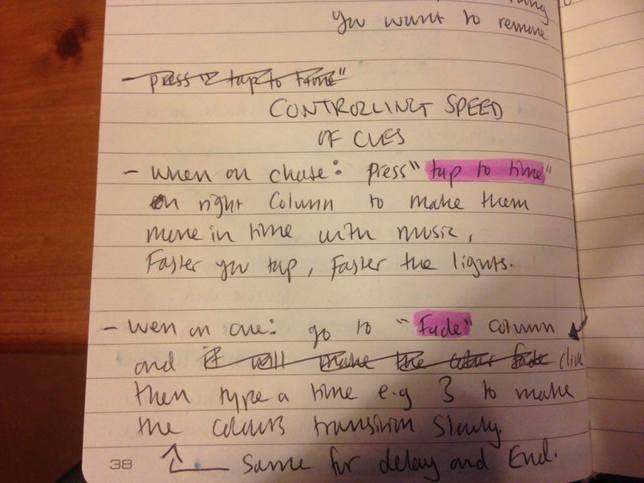
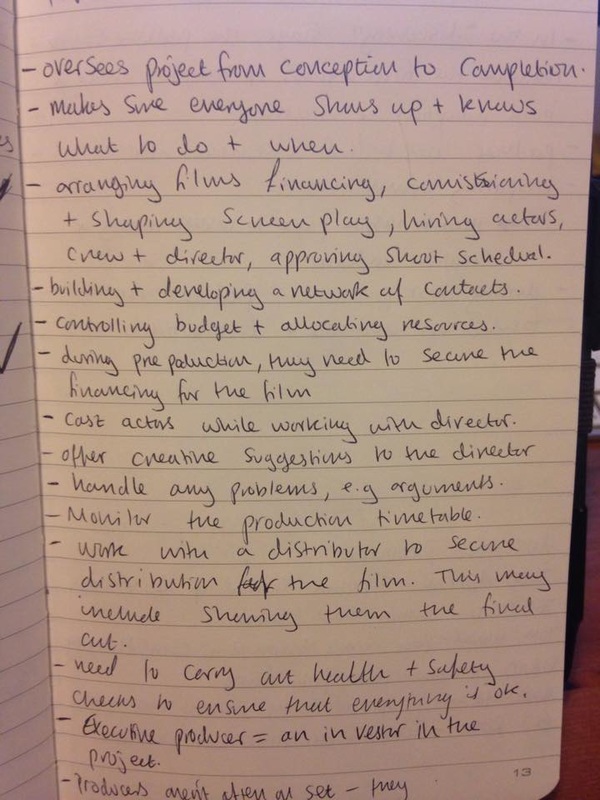
I took notes while we were talked through how to open the program. 
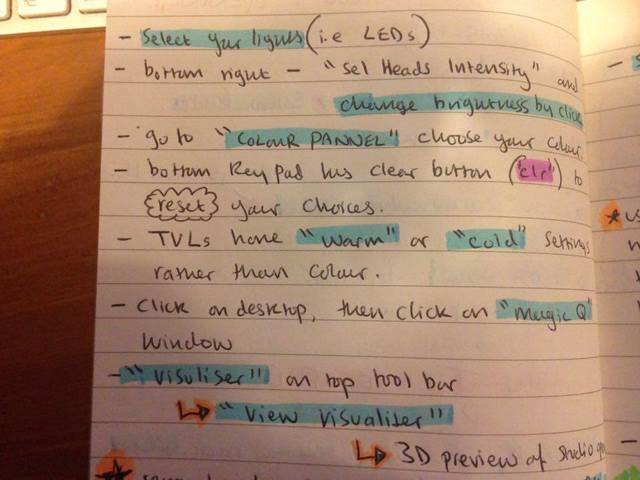
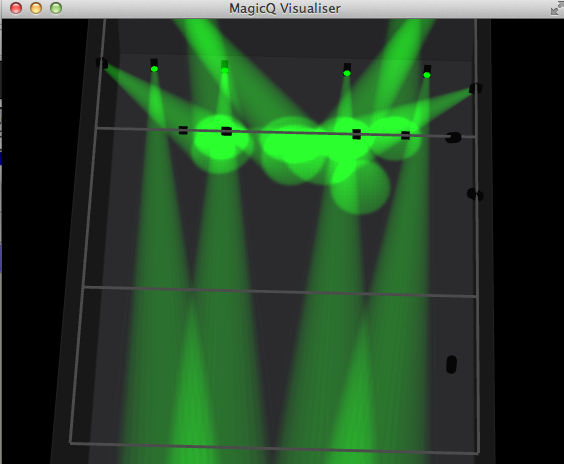
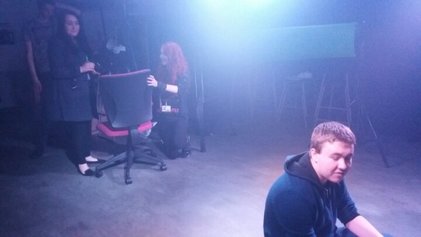
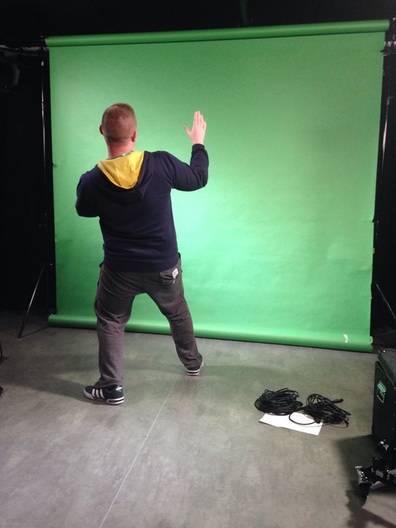
This is the 3D preview that you can open which allows you to see the effects you're trying out. You can spin it round to see the studio from different angles which is good as some of the lights are on the floor and you'd get confused if you could only see it from above like you can in the picture.
Primary ResearchPrimary research is research that you complete yourself. It's information that you have right in front of you that isn't from another information source. It is "original primary data collected by the researcher". Some examples of primary research include: interviews, surveys/questionnaires and observations/ notes taken during an event. This kind of information you have to collect and research yourself, so it will take a lot longer than secondary research. Primary research is more effective as it isn't from a second source and is very honest. The researcher is also free to do their research as they please and they don't have to stick to any guides. However there are some disadvantages to primary research such as not being able to get hold of original documents and things. Then there is also the risk that by the time the research is completed that the research will be out of date. For my project, I unfortunately didn't do very much primary research. The only primary research that I did was going to the Civic Centre and taking pictures and such to see what an office was like, as I've never been in one before. The 14 second film that we created also counts as primary research, as we were experimenting with our genre. Secondary ResearchSecondary research is the easiest research to get a hold of and use, as it is so widely available. Secondary research is research that has been completed by someone else and put out for others to use. An example of this would be research from the internet or out of an encyclopedia or something similar. The advantages to this type of research is that it is so quick and easy to use, as you can just type what you're researching into a search engine and an abundance of different research sources are at your finger tips. It is a great deal faster than primary research and you can access it at any time. However there are disadvantages to this type of research as you can't always be sure that it is reliable or true. So if you are using this type of research, it is recommended that you use a range of different secondary research sources so that you can back things up, just in case one of the sources you've used isn't entirely trustworthy. Throughout this project I have used mainly secondary sources, but a wide range of them and I have linked them at the bottom of each of my posts where I have used them. For example, in my research on my producer role I l recorded all the websites that I used. While I did use Wikipedia for some of my research I used other sources too to back up what I found on there. Quantitative Data This type of data can be recorded for both primary and secondary research, depending on what research "style" you go for. Quantitative data, as the name suggests is to do with numbers. What this means is data that can be measured such as the dimensions of an object or even timescale of an event or something. Some examples of this would be that the film "Alice In Wonderland" lasts for 108 minutes, and I got this information from the back of the DVD box which is primary research, as I got the information from something direct. Another example of this kind of data would be that the boom poles we use in college are 3m long. I got this information from a website, so this means I used secondary research here. QUALITATIVE DataQualitative data is relative to descriptions: it can't be measured, but it can be observed and described. An example would be colour, as this can't be described with a measurement, same with senses such as smells or tastes, you need to describe these things. For example when I look at the "Alice In Wonderland" DVD box, I can see there is the Mad Hatter in the center with bright orange, curly hair, and a top hat with a light pink ribbon wrapped around this. By looking at the DVD box and describing the colours, I have just completed primary qualitative research. An example of secondary qualitative research would be me using a search engine to find out what a certain combination of colours would create, so for example, what would the colours green and purple make? Sources:
https://owl.english.purdue.edu/owl/owlprint/5 http://regentsprep.org/regents/math/algebra/ad1/qualquant.htm59/ Today we were set the task of making a 14 second long film based on the genre of our main project. For our group our genre was psychological horror. We had a quick think about the conventions of a psychological horror such as jump scares- making the audience jump, taking place in a generally "normal" location such as a house or a school, very dark looking- sometimes with a wash of colour such as green or red as these colours suggest envy and danger, sometimes masks are used to change the look of the unsuspecting killer. Psychological horror films rely heavily on the fears and beliefs of the character. To help us with our ideas, we quickly searched for 14 second horror films to inspire us and help get some ideas flowing. This is the film that inspired our idea: This film inspired us as it was very subtle and effective, so we had an idea about using a mask to creep up on an unsuspecting person in a scary setting and make them jump. As we were keeping our same production roles from our main project (to create a 3 minute film) it was my job as the producer to find a way of getting a mask. It was suggested that we call our local party store "Struts" to see if they would let us borrow one of their masks for an hour or so, as we didn't feel it was necessary to spend money on this project. When I called, we were told that we couldn't borrow one of the masks due to it being halloween and all the masks were selling so fast. However we still had another option which was to go to the performing arts dressing room. The director and I went to go see one of the performing arts tutors to get permission to see if there were any masks in their costume room. When we went in we unfortunately didn't find any horror masks like the ones we initially wanted. However, we did find 7 plain white masks, which were actually pretty scary due to them being so smooth and expressionless. We also found a gas mask which looked pretty interesting so we borrowed that too. Now that we had secured the masks that we had, we now had a direction for our film. We thought that having a person being haunted by people wearing the white masks. Then Ethan (our director) put the gas mask on and commented on how it was difficult breathing through one and someone made a comment about it being about smoking- and there was our idea: a horror film based on addiction. It was decided that our film is about a boy who struggles with his addiction to smoking, and he has these demons that are haunting him and encouraging him to keep on smoking and causing himself harm. While the idea itself doesn't sound all that frightening we are hoping that by shooting it in the black box studio with some effective lighting, we will be able to make something that looks extremely creepy. Below I have added our idea that we wrote down and also a picture of the storyboard: We went into the black box studio and began setting up our equipment. Kira, our sound operator wasn't needed to record audio here, as the only "dialogue" we needed was heavy breathing, which could easily be recorded later on, so Kira took on the job of lights operator, as we needed different lighting for different shots. For our first shot which is of the boy sat in the middle of the floor, we only needed fairly basic lighting which was pretty dim. We wanted it really dark, however this caused problems for our camera operator as it was too dark to clearly pick things up even when she changed the ISO. For our first shot we needed to move the camera along towards the boy sat on the floor, and we wanted this to be as smooth as possible, so our camera operator sat on a wheeled chair with the camera resting on the back of it, and I pushed her a long as best I could. I pushed her very slowly, as we were just wanting it to be smooth rather than fast, as the speed can easily be changed later during editing. The next shot that we needed was of the boy looking up and a masked person sitting there looking directly at him. We thought that having some red lighting at this point would be effective, as red is symbolic of danger and at this point we want it to appear like the boy is in danger. We had the red light come on after the boy looked up. This was quite difficult, as I was in charge of telling Kira when to change the lights and there was confusion as to who was doing what when, so this shot took a bit of time to get right. We did another scene where the boy is standing up while surrounded by the masked people and then we moved on to our final scene which the film has been building up to. As we were only a small group, we all had to act in it (aside from Jemma the camera operator as she needed to record everything), we also needed to add three people from another group so that there was lots of scary masked people behind the boy in the gas mask for the final shot. The reason why the boy ended up with the gas mask on is because he succumbed to his addiction to the smoke. We used the haze machine to create a thick smokey haze to enhance this. Below I have added some photos that we took during filming: Once we had finished filming, we went into the editing suit to make it into a 14 second film. We expected this to be quite difficult as we had quite a lot of footage, but it was actually surprisingly easy. Our editor Connor did most of the editing: adding lots of fades between cuts to build tension, and then static visual effects like you'd get on old TVs. Our sound recordist Kira added sound to the film using preset sound effects from Final Cut Pro 10 (the editing software that we cut the film on). Even though the sound effects were just free ones that were in the software, there were some ones which fit our film perfectly. Kira recorded Ethan breathing heavily for the end, and then imported it into the film. Here is the final finished film: Evaluation:
I think that our film was fairly successful because it met the brief which was that the film had to be 14 seconds long. I think that it's clear that our film is a horror film as we kept in line with a few conventions of psychological horror: red/green colours over the footage, building up to something big and being very unusual. However, I think that our use of colour was a bit too much, it might have looked better if the colour was more subtle in parts, however we can easily change this later in editing by changing saturation and hues etc. The parts that are lit with the red I feel are the most effective, particularly at the start where the light goes red and then the boy looks up. At some points the camera is a little out of focus, but I think that this is just down to the amount of haze and also that it was very dark in the studio. As a whole, I think the finished thing is pretty good, it could maybe have done with being slowed down at some parts, but then it would have exceeded the 14 seconds. This small project was really helpful as it gave us a small taster ready for when we start filming our end of unit project. I was expecting it to be more stressful, but it really wasn't and now I am really looking forward to filming week when we return after half term.
Producers work on a film from "conception to completion". While they may not necessarily be on set the whole time, they're the ones who are there coming up with the initial ideas, who then see that idea through to the final finished film. They are doing something at each stage of the film making process; these processes are: Pre Production, Production and Post Production. All three stages are essential for completing the film. Before pre production can even begin, if a book or something is being adapted into a film, the producer needs to retrieve the rights so that production can begin. Pre production is a very busy time for the producer as they have to make sure that everything is being organized so that the production can begin. During pre production, the producer needs to secure the financing for the film. Securing financing is important, so that the producer can work out the budget and which resources to spend it on and such. It's important for the producer to stay in control of the budget so that they don't run out of funds and stop the production of the film. The producer is in charge of the financial side of things as opposed to the director, so that the director just has to focus on the creative side of things. Casting is another task that needs to be completed by the producer (and also the director, however the producer generally has the final say) during pre production. Not only does the producer have to cast actors, but they also need to cast their crew and director. Hiring cast and crew is a good reason for the producer to develop a network of contacts so that they can easily get in touch with a wide range of people in case some crew/cast members can't make it. Having a good network of contacts is also good for adding production value, so for example if you're in contact with someone who owns a location you need for shooting, e.g a big country manor, all you have to do is give them a call or pay them a visit. Another thing that producers need to do during pre production is come up with a production time table so that everything runs smoothly and is completed on time. Having a production time table is really helpful if you have to book a location on a certain day for a certain length of time, so then you will be able to plan the rest of the production around it. It will also benefit the Producer's crew and cast so that they know where they have to be, when they have to be there and how long they need to be there. All through production, the producer needs to monitor this time table so that they're up to date with whats happening and can make changes if necessary. Having a production timetable also helps with time management. The next stage is the production which is when filming starts. While filming is going on, it is often rare to see the producer on set as they are busy taking care of other things. However some producers are on set a lot- it's just down to personal preference and whats going on. Sometimes the producer may want to give the director some creative suggestions for certain scenes and such. The producer will need to carry out health and safety checks before filming begins so that every risk is taken into account. For example, if you're filming on a construction site, you will need to ensure that every crew member is wearing the appropriate clothing and that the actors are safe and secure. It's also the producers job to know when the cast and crew are going to have food and drinks, as this is often forgotten, as sometimes you will film for many hours at a time. To sum up what producers do during production: they ensure the smooth day to day running of the cast and crew. Once filming is finished, the next stage is post production. During this stage the producers main focus is the audience and the distribution of the film. The producer needs to work closely with the distributor to get the film distributed, they need to be good business people so that they can sell the film and get it the views and recognition it needs. The reason why the producer needs to work with the audience is so that they can find out what they thought of the film, and if it met their expectations and such. So for example, if it was a horror film, they would need to know if it made the audience jump or feel uneasy and afraid. Another big aspect of a producer's role is the production paperwork. The production paperwork is all the legal stuff, such as contracts with crew and cast members, call sheets, camera shot lists, film budget sheet, location information and insurance. Contracts are important so that the cast and crew know what is expected of them and what they will be doing during production. It's also good to have a contract so that if someone tries to make a claim against you, you will have the contract. A call sheet is for the crew and cast members so that they know when and where they should report on filming days. Having a list of camera shots is also useful, as it will help you know whether a location will be suitable for filming based on the shots you want; so by this I mean, if you were to film in a confined space you would need to know what shots you were using to know if it would be achievable to film there- is there enough space, will the camera be in shot? A budget list is extremely important so that the producer knows what and where the money is being spent. It helps to stop the production from running out of funds, or from spending the funds on the wrong things. Renowned producers and who inspires me There are many film producers such as: Steven Spielberg, Ridley Scott, Quentin Tarantino and David Heyman. They've all produced some truly fantastic pieces of cinema. They've become real icons in the film industry because of the success of their films. Although these producers are all really amazing, two of my favourite producers are Eli Roth and Jason Blum. Both of these producers are known for their horror films, and most of the horror films that they have created are seriously great and really get your heart beating fast. My favourite film produced by Eli Roth is Hostel (he co produced it with Mike Fleiss and Chris Biggs, as Roth was directing the film). What I like about Hostel is just how gory it and thus how uncomfortable you get while watching it. The film follows the conventions of a horror-thriller extremely well which makes it so successful. One of the scenes that's really awful (this is a good thing, as it is a horror film) is the scene where the girls eye is ripped out of her face, and when she gets a glimpse of her reflection in the train window she proceeded to jump in front of it. The whole film is just so dark, but it's so wonderfully executed and keeps you right on the edge of the seat. While doing research on Eli Roth, I found out about something funny that occurred on the filming set of Cabin Fever: while they were filming, Rider Strong went off for a wonder around the woods (with his gruesome and bloody special effects makeup on), he came across some schoolgirls who were on a school trip and terrified them at first due to his horrible appearance, but then one of the girls recognized him from another film he starred in and he ended up being mobbed for pictures and autographs. Jason Blum is another extremely talented horror film producer. He is also the founder of Blumhouse Productions (which you see at the beginning of a very large number of horror films). One of his earlier films he produced is called Insidious (which has now gone on to become a trilogy, however in my opinion the third film wasn't really needed as it doesn't really add much to the film, where as the second film was excellent as it helped to explain events from the first film). I'd say that Insidious is actually one of my favourite horror films, because no matter how many times I watch it, it still makes me jump every time and still leaves me cautiously looking around my bedroom before I go to sleep. If I went on to be a producer, I would definitely want to follow in Jason Blum's footsteps. Below I have added a clip from Hostel that is very gory (as I couldn't find the scene with the girl and her eye on YouTube) and also a clip from Insidious which is only 2 minutes long, but I guarantee it will make you jump.
Sources: http://blogs.britannica.com/2007/02/what-does-a-film-producer-do/ http://www.prospects.ac.uk/television_film_video_producer_job_description.htm http://entertainment.howstuffworks.com/movie-producer2.htm https://en.wikipedia.org/wiki/Film_producer http://theconversation.com/explainer-what-does-a-film-producer-do-2217 http://filmmakeriq.com/2009/04/588-free-film-contracts-and-forms/ https://en.wikipedia.org/wiki/Jason_Blum http://www.imdb.com/name/nm0089658/ https://en.wikipedia.org/wiki/Eli_Roth http://www.imdb.com/name/nm0744834/ https://en.wikipedia.org/wiki/Cabin_Fever_%282002_film%29 I found this video really helpful, as it explained the role of a producer in a brief and easy to understand way.
Today we were set our first practical project. Before we could begin coming up with ideas, we had to understand the different crew roles. The four main crew roles are: Director, Producer, Camera Operator and Boom Operator. Since we were in groups of four, each of us were able to have one of these roles. In the group I was in, I got to be the producer/ director (as the person who was the director was also acting, so I had to help out with directing here). Our brief was to come up with a poem of our choice and film it however we wanted. Our group didn't really have that much knowledge on poetry, so we searched for some on the internet. First we searched for "poems about life" however this didn't really inspire us, so we decided to first think about options we had for locations. We all really liked the idea of filming something outside, so we thought we should look up poems about nature. We found a really useful website (http://www.familyfriendpoems.com/poems/famous/nature/) which had loads of really lovely poems about nature. We looked at various poems on the site including one about spring, and one about birch trees, however they just weren't quite what we wanted. Then we came across one called "The Minor Bird" which I will post below. I have wished a bird would fly away, While the poem is very short, it flows really nicely, and instantly started giving us ideas about filming some really nice scenes of birds in the grounds of the cathedral. We thought that the poem was quite melancholic and so we thought that we could have an actor read the poem in a very distant and sad way to further emphasize the melancholy in the poem. Before we just went out and started filming, we thought that we had better check what limitations the cathedral had on filming, and we came across this note on their site: As we only had around 2 and a half hours to get our footage, we didn't think we would have time to get permission to film and get some decent footage. We then decided that maybe Bitts Park might be a better location, and we also felt that we might have more of a chance of seeing more birds at the park, so it was maybe a better idea after all to go to the park. When we got there, straight away we saw a little grey squirrel rushing about, and we knew that we had chosen a good location to film.
To finish off filming, we wanted to get some b-roll footage. There were lots of mushrooms growing around the park, so we thought that these would be effective for b-roll, so we changed the camera lens to a close up one, so that we could get all the detail of the mushrooms in. Another idea that we had for b-roll was falling leaves. First we tried to shake a small tree and make leaves fall that way, however this didn't work due to Jeremy being in the shot, and also because only one or two leaves fell. We then tried collecting fallen leaves and dropping them in front of the camera, however this was very difficult, as we couldn't get the leaves to focus and fall how we wanted them to, and because we were running out of time, we had to abandon this idea. I think we did manage to get some really nice shots for b-roll. One of my favourite shots was of the camera panning down the trunk of the tree to Michael who was sitting beneath it. Overall, I'd say that our filming was fairly successful, as although we didn't get all the shots, I still think we had enough to go back and edit them into the video. After looking through the footage during editing, I discovered that we had some really lovely shots. Even though a few of them are a little out of focus, they still work well for what we need them for. The audio that we recorded however wasn't very good due to all the traffic noise in the background, so I'm going to use audacity to record myself reading the poem and then I'll import it into iMovie and add some music and sound effects. While looking through the footage, I also found that Jeremy had managed to get some really great shots of the squirrel in the tree, below I have added the recording of the squirrel- as you can hear we all got really excited about it. I thought that a nice ambient soundtrack would be good for the film, as it is a poem about nature. I didn't want to use a track that was copyrighted, so I decided to use a website called dl-sounds as this is a free website for downloading sound effects and music for personal and commercial use. I didn't need to download any sound effects, as iMovie had a decent forest sound effect, so all I downloaded was a track called: "Minimalism" which is very calming and matches the tone of the poem. Here is the final film: Evaluation: I think that our film is good because the music and footage match the poem well. I think I got a bit too hung up on the squirrel footage as that takes up the majority of the film. I think if we had chance to do this again we could do with a few more close ups of leaves and grass, and possibly some shots of birds as the poem is about birds. Sources:
http://www.familyfriendpoems.com/poem/a-minor-bird-by-robert-frost http://www.dl-sounds.com/ Today we had our first introduction to lighting in the studio. We started off by looking at health and safety, as this is very important in the studio as there are lots of things to be conscious of- such as working at height or tripping over wires. Working at height is considered to be anything that is off the ground. If you're using a ladder/platform you must always have 3 points of contact- this is both your feet on the ladder/platform and one of your hands in contact with the ladder/platform or the rig. This is so that you are stable and also so that you can safely carry things up to height. Another major thing in the studio are electrical devices which can pose health and safety risk.You must always complete visual checks before plugging or unplugging anything - look for bare wires, wires not connected properly and broken parts. Another issue is overloading power sockets; while the studio is very suited for its purpose (as in you can't overload the power supply), when you are working on site you may be in a house and the sockets in a house aren't as powerful as those in the studio, so if you plug all the equipment in the studio into someones house you will definitely overload the power supply. One final thing that causes problems is tripping up over wires. You need to think about where your wires are and make sure they have safe cable runs. If you're going to have your wires trailing right across the floor for long periods of time, it's best to tape the wires down so then no one will trip. Sometimes the shortest route to power is the most inconvenient as it won't be the neatest, so its best to take the longest route (going around the edge of the room with wires). The next thing we looked at were the types of lights in the studio. The first lights we looked at were called LED Par Cams, these are very low power so they have a cool operation which means they don't generate much heat. This is a good thing, as if you are spending a long time in the studio you don't want to overheat from working under boiling hot lights. These lights are also RGB colour changeable DMX, what this means is that they can change colours digitally via a DMX cable which is linked to a computer. The second lights we looked at were the LED Panels (which are also known as TVLs) these lights are low power like the LED Par Cams, so they also have a cool operation. These lights can also be battery operated which is very useful if you are wanting to use them in a location that doesn't have a mains power supply. The lights are Bi-colour changeable DMX which means that they switch between white daylight and yellow inside light. They produce a very soft light which can be made even softer by applying gels over the lights. What a soft light means is that the shadows that it casts are very soft, unlike those of a Fresnel light which I am moving onto next. The Fresnel lights are very high power lights- you can actually hear the buzzing from the resistor. These lights operate very hot, so if you're using these in a small space, you will find that the room heats up very fast. These kinds of lights are your traditional theater lights. They're semi focusable with medium/ hard light. This means that the shadows cast by these lights can be very sharp and defined. The brightness of the lights can be changed via DMX. Finally, we looked at Jr Profile Spot lights. These are similar to the Fresnel lights as they are high power, hot in operation and are dimable via DMX. however these lights only have a hard light, so the shadows cast will be very sharp. You can adjust the lights so that you can change the focus, what I mean here is that you can have a large spot of light or a tiny spot if you alter the filters on the light. Once we had gone through how each light works and had seen it in action, we went off in groups to connect four LED Par Cams via daisy chain DMX. what this was, was linking the wires from input to output to make sure that all four lights were linked together. We then had to put power cables into the input ports on all of the lights so that they had power. You can do the same daisy chain technique with power, however we just didn't have the right cables at the time. On the back of the lights we had to program them so that they could be controlled by the DMX board so that we could change the colour and brightness and such. We had to select the 'D' mode (for DMX), and then we had to number them. On the DMX board you can only go up in sixes, so the first light was number 1, the second was 7, the third was 13 and the fourth was 19. Once this had been selected on the back of the lights we were able to control them with the DMX board. I really enjoyed doing this, as I'd never done it before and I'm surprised at how much I learned in such a small amount of time. Below I have added some pictures of my group with the LED Par Cams.
Statistically, 1 in 4 people in the UK will experience mental health problems over the course of one year. This means that most people will experience it during their lives: be it affecting them, or someone they are close to. Dogs are incredibly happy animals, just watching them makes you feel happy. When you have a dog of your own, its a whole other matter. If you've had a bad day and you go back home feeling sad and defeated, having a happy little ball of fur flying up to greet you like he hasn't seen you in weeks is the best thing ever. Those feelings of sadness are instantly lifted, because someone is overjoyed that your back home. This is the reason why everyone in the world should experience the love of dogs. Everyone would be so happy and positive all the time. Here I'm going to post some initial sketches of some ideas for my drawing:
The reason why I chose to do my drawing digitally is because that is the medium that Semenov uses. I could have done a drawing, however I find that for something like this a digital drawing would be better as you can add effects and such which are hard to achieve with a traditional drawing on paper. I think that a sculpture would also have worked really well for this, but due to me not having any clay, I don't think I could have got it in time to create something effective. If I had had more time to do this project then I would have definitely done a sculpture as I could see my initial ideas looking quite good as sculptures - especially the second one, as I could use some string to suspend it in the air so that it looks like the dog really is sat on the earth.
The finished design This is my final finished project. I think it's kind of similar to Semenov's style, as the dog looks quite creepy while still being cute. My design is a lot brighter than Semenov's works as I needed half the world to be really colourful so as to show off the power that the dog has. The pink in the middle is supposed to be a sort of cloud spreading across the dark side of the world to make it all bright again. The reason I went for pink is because its very bright and is often associated with good magic in fairy tales. If I'd had more time to do this project I would have taken more time on the colouring of the dog and on the background, or I may have done something entirely different.
My initial idea for the project was a painting/poster of a monster (in the style of Semenov) Facebook logo to show how social media has changed the world for the better and also for the worst. I thought it would be quite interesting to look at the ways that social media has changed the world. I'd quite like to look at something that's a bit more personal, as Semenov's works are personal. What I would like to look at are the issues that many young girls have with their self esteem and how this can lead to serious illnesses such as depression and anorexia. My idea is that if girls are more supportive of each other and realise how damaging their nastiness and bitchiness really is, we can be closer to making happier, more confident and stronger girls who can go on to do great things- maybe they could go on to be prime minister and completely change how the UK is run. What this idea would lead to is to creating a drawing of a very sad and hurt girl (in the style of Semenov) being held up by other girls to look at her reflection in the mirror. I was inspired to look at a topic like this, as Semenov's works are very emotional and personal, so I wanted to look at something that was both emotional and personal to me. As much as I like this idea, since my internet at my house has gone down, I think it's unrealistic for me to finish this project looking at this topic, as when I draw people it often takes me around 8 hours or so, which is something I don't think I can achieve in this time period. Another idea I had was about dogs. I thought of this idea while I watched my own dog running up and downstairs with a crocodile toy in his mouth. Dogs make people happy, they're loyal and intelligent. If everyone had a dog, I truly believe it would change the world for the better. I could actually kind of link it in with what I mentioned above about depression. When I typed "dogs and depression" into google, I found an abundance of links on how dogs can 'heal' depression. What I could create from this is a drawing of a dog in the style of Semenov bringing happiness to humans. If dogs could rid the world of depression, the world would be a much better place; depression makes people unmotivated and they can't work or do anything, so if depression was rid from the world, so much more would be done due to people being more motivated and happier. The artist I have chosen to research is Anton Semenov who is a male artist from Russia. There are a few reasons why I like this artists. One of the reasons is because the creatures that he creates are very haunting and scary, while still being sort of cute. You can see in the picture above how the picture is quite scary while still remaining cute and innocent. I think that Semenov's work is very emotional, as his character's expressions are very visual and you can almost feel how his creatures are feeling. I think that some of his work is very meaningful, especially one of a creature stood behind his bedroom door in pyjamas, hiding from a monster trying to get in - this could be symbolic of child abuse. His work is extremely creative and he has lots of ideas and concepts, however all of his work has the same dark and haunting theme. Semenov describes his style as "surrealism horror", which I think is a pretty much spot on description of his works.
Sources: http://majavuckovic.com/blog/2015/02/interview-with-anton-semenov-aka-gloom82/ Yesterday, we had our first introduction to sound with Craig. We were shown how to use a Tascam: holding down the stop button to turn it on, setting levels etc. A Tascam is an audio recording device which can be used on its own (due to it having built in speakers and microphone- which makes it very versatile for taking with you on the go for interviews etc) or used with a microphone plugged into it. The microphone we used was a 'Rode NTG-2' which is very lightweight and can be operated by either a AA battery or phantom power supplied by the Tascam or other power supplies such as cameras. The Rode microphone is most sensitive to the front, so it is important when recording with it to point it directly at the source of sound, other wise it won't pick up the sound as clearly. You must also take into account that the microphone will also pick up sound from directly behind, which is why you'll often find that news reporters stand parallel to traffic so that they don't pick up too much of the noise. When working outside with the microphones it may be quite windy which will cause background noise and ruin the recording. To solve this you can use a wind shield or even a blimp if the wind is really bad, to try and cancel out some of the background noise. Next, we were shown how to hold and place a boom pole. A boom pole is a lightweight extendable pole with a weighted end to make it easier to hold. A boom pole is designed to suspend a microphone close to or over a sound source. The boom pole supports the weight of the microphone without it causing any discomfort or being too heavy for the boom operator. With a boom pole you can easily follow your sound source and change positions. There's four main ways that you can hold a boom pole:
The first place we did our recording was in the editing suit, we thought this was a suitable location as it was a very small room, had low ceilings and was carpeted. However there was a bit of ambient sounds coming from the lights and the computers. The second indoor place we recorded in was the stairwell of the art building. We had our speaker stand under the stairs so that the sound didn't echo as much, We then went outside to the bike shelter by the front of the main building. We used a windshield over the microphone, as although we were in quite a sheltered area, it was still fairly breezy. In the picture below you can see that I'm putting my arm out, so that Jemma can have the boom pole in the right position to catch my voice the clearest. The microphone needs to be an arms length from me. In the photo above, you can see that he's holding the boom at waist level as there isn't enough room for him to hold it over his shoulders. He could also have held the microphone in a pistol grip.
Today, we had our introduction to camera's with Ed. This wasn't my first time with using a DSLR camera, as I have one of my own, but it's very old and doesn't have as many settings as the ones at college.
First we looked at how to focus the camera, which is very important, as you don't want your photographs or footage to come out blurred. You focus the camera by moving the front ring on the lens. You have to be very careful with the lens of the camera as it is extemely fragile and sensitive. When you're changing lenses over, you need to be fast so as not to expose the back of the lens to light for too long. You also need to keep the lens cap on while you're not using the camera to protect it. When filming you need to make sure that the ISO is set correctly. The ISO tells you how sensitive the camera is to light, so the higher the ISO number, the more exposed the picture will be, so when we used the cameras, we set the ISO to as low as possible without the image on the back of the camera being too dark. Next, we learned how to fix a camera to a tripod, which was more difficult that I'd expected it to be. You have to be careful not to over tighten any of the knobs so that you don't break any internal parts, or make the tripod unusable. When making the tripod taller/ lowering it, you really need someone else to help you so that you do it safely, and also so that the tripod is level for the camera. However there are little spirit-level bubbles which help with knowing when the tripod is level. After we had all mastered putting the tripods up and getting the cameras on top, we went off in groups to get used to using the cameras. In my group, we decided to try and do a lip sync music video to one of Mika's songs "Lollipop". We stayed in the projection room to do this, as we needed a bright colourful background. We just used a brightly coloured gif, but made it fullscreen so that it appeared like a background. The only problem with having the background projected like this was that the light got in your eyes; when we looked back at the footage we were almost always squinting when facing forwards which kind of ruined it a little bit. Due to the amount of time we had, we only did the first minute of the song, so we did lots of different takes and then later when we edit it, we will slot them all together. Most of our footage was just us dancing and lip syncing, but we thought that we should have some extra bits in it, so we got Abbie to lie on a chair and move her legs around in front of the background, as we thought that this would look quite fun. Below, I have added some pictures that we took while filming. On Monday 15th September, we went into the editing suit to get to grips with Final Cut Pro 10. Previously to using Final Cut, I had experience of editing using iMovie, the things I edited on iMovie were my YouTube videos, which really only required some very basic editing of speeding them up, cutting some parts out and changing the audio. Before I used Final Cut Pro, I was expecting it to be very confusing and be very difficult to use, However due to my experience using iMovie, I didn't find it that hard to use, as some aspects were the same such as reducing the audio on a clip, or inserting titles and transitions. In the editing suit we were shown that you need to have a: library, event and a project. We used some footage from last years students of a man called Jack Turnbull who believed in aliens. We created a rough cut using the footage of Jack and some b-roll. We used the blade tool to remove parts of the footage where the people filming can be heard shouting "go" and such. We were also shown how to zoom in on a clip and how to crop, however you have to be careful when zooming on a clip as it is a digital zoom and will reduce the quality - however as we had 4k footage we didn't need to worry about this so much. Once we had the clips of Jack cut down to how we wanted them, we added in some b-roll with some 'cross dissolve' transitions on either side of the b-roll clips. After adding the b-roll we then went on to add music as a backing to Jack's speaking. We used a piano music soundtrack, and then added some forest sound effects. We had to adjust the volume of different parts of the audio so that you could hear everything clearly without Jack's voice being over powered. After doing our rough cut, we then went on to look at 'mulitcam' and how its used when making music videos. I found this quite challenging as I'd never done something like this before, however I think that we were quite successful in the end. We had footage of a folk band with 3 different cameras on each member of the band. First, we had to synchronize all three of the camera angles, by selecting them in the event and then choosing 'multicam' from the drop down menu. This then allowed us to play the footage and then click on each camera angle when we wanted it to play. Multicam uses a colour coding system of: yellow to switch audio and video, blue to switch video only and green to switch audio only. As we were using a recording for the sound, we only needed to switch video angles, rather than the videos with the audio as well. Finally to finish, we had a quick introduction on how to use green screen footage, which was surprisingly simple; we imported the background image that we wanted to have behind the girl, and then we imported the footage which went above the image on the timeline. We had to crop our green screen footage a little, as our background image was quite small. Once we got it working, we then had a play around with effects and such. The earliest films were shot with one single static shot, as back then, motion was all that was necessary in the shot. One of the earliest films from 1898 to feature more than one shot was Robert W Paul's "Come Along, Do!" (which I have inserted a picture of above). The film was only 1 minute long, however only 38 seconds of the film are still around today. However it was Edwin S Porter who showed everyone that film didn't need to be one long still. Porter worked as a projectionist using the Vitascope which 'cast images via film and electric light onto a wall or screen. One of his duties as a projectionist was to illegally duplicate George Méliès films (who was a french illusionist and filmmaker). Porter duplicated the films by taking apart 'one act reels and combine several of these into a 15 minute program.' Before digital editing (the editing on computers that we use today) there was analogue editing which involved film negative being cut down and pasted into an order; the film then went through a machine which allowed the film editor to see the film while they edited it. Sources:
https://en.wikipedia.org/wiki/Come_Along,_Do! http://www.earlycinema.com/pioneers/porter_bio.html http://www.slideshare.net/katierothery/history-of-editing http://www.britannica.com/biography/Edwin-S-Porter https://en.wikipedia.org/wiki/Vitascope http://www.geniusdv.com/news_and_tutorials/2013/12/final_cut_pro_x_multicamera_editing.php The other day we watched a sci-fi thriller called 'In Time' One of the main themes in the film is currency. The time on everyone’s forearms is used to pay for day to day things to keep them alive such as food. In the slums people got by in their day to day life with just hours and minutes on their clocks. The people with the least amount of time on their clocks lived in the most poverty and would most commonly die of one of two causes: “timing out” (which is running out of time completely) or being killed by another human by having their time taken. This is reflected in the real world; people who have the least amount of money generally live in very poor conditions and have very little money to keep them afloat in everyday life. Generally people who have the least amount of money have a poorer quality of life as they can’t afford to live- by this I mean buy food, clothe themselves and have a roof over their heads. On the other end of the scale in the film are the rich; they don't need to constantly watch their clocks, as they have years and centuries on them, so currency is not an issue for them: anything they want they can pretty much have. The rich seem to live a lot more comfortably than the poor, and due to them living in an entirely different time zone to the poor, they don't need to worry about people trying to steal their time. This is reflected in a real life situation, as the people who are very wealthy such as members of the government (and also entrepreneurs) who live life comfortably and can afford whatever they want. Their money effectively gives them power and control over people who are beneath them. An example of this that directly affects people who are around my age are the cuts to education. The government are planning cuts on maintenance money for working class students, which could mean many students will have to say goodbye to their dream university, which is extremely unfair, as the students who are in university now, or who are going in the next few years, are the future of this country. A further example of how the government are putting their power over the public are the benefit caps and cuts, which are going to affect around 100,000 families who are unemployed or who have very low income. These 100,000 families are being threatened with homelessness and poverty, These affected families will be receiving between £385 and £442 (for London) a week. Meanwhile the MP's have recently received a go ahead for a pay rise of 10%, which means they'll be earning £74,000. However it's not just the low income/ unemployed families who have experienced the cuts. The public sector pay rises have been restricted to 1% for the next four years, which is already on top of a five year long pay freeze. When you compare this to the 10% rise that the MP's are going to receive, you can see how large the divide is between the r'ich' and the 'poor'. Near the end of the film, people can be seen escaping their poverty ridden time zone into the richer time zones. This has disrupted the order that the rich had in place and they have no idea how to deal with it, due to the amount of people coming through and how suddenly it happened. Recently in the news we have seen a story very similar to this which is the refugee crisis. People from Syria are crossing boarders to European countries to escape from the war and get to safety. Some countries such as Germany are welcoming refugees and offering them a place to stay; however countries such as Hungary are not so accepting, and they've recently shut their boarders. Hungary was seen by the refugees as a sort of gate way to northern and western Europe. Hungary have began rejecting asylum applications and have also enforced new laws which allows them to arrest refugees who cross their boarder. There are a few reasons why refugees are seeking refuge in European countries; one of these reasons is that it is easily accessible on foot. There was a disaster in which refugees tried to flee by a boat which ended up capsizing, and the appearance of the distressing photo of the little drowned boy, who changed the everyone's opinion on the refugee crisis over night. Sources: http://www.bbc.co.uk/news/uk-politics-33552499 http://www.theguardian.com/society/2015/jul/20/lower-benefit-caps-exclude-poor-families-make-cities-unaffordable http://www.theguardian.com/education/2015/jun/15/working-class-students-maintenance-grant-cuts http://www.theguardian.com/world/2015/sep/16/refugees-enter-croatia-from-serbia-after-hungary-blocks-border http://www.theguardian.com/public-leaders-network/2015/jul/08/local-government-emergency-budget-2015-key-points http://www.theguardian.com/public-leaders-network/2015/jul/08/pay-cap-public-servants-budget-2015 http://www.vox.com/2015/9/5/9265501/refugee-crisis-europe-syria |
Archives |